 Note:
Note: For printing purposes, you can
SHOW ALL or
HIDE ALL
instructions and images.
Implementation
This document gives specific configuration instructions for using Windows
XP's Internet Explorer with proxy certificates. This will allow you to
verify that your server is correctly set up to perform both server and
client verification with the appropriate certificates.
Client Setup
Most web browsers can be configured to handle
'normal' user certificates, but from the testing we have done so far, only
Windows XP's "Internet Options" control panel correctly handles proxy
certificates. We hope to continue testing various clients to find other
proxy certificate compatible solutions.
Creating and installing (proxy) user certificates is more difficult than
creating a server certificate because the user must generate a key-pair,
keep the private key to himself, and send the public key to a Certificate
Authority (CA) to be incorporated into a certificate request. Once a signed
user certificate has been created using a CA, the certificate must be
installed in a client application so that the client may present it when
needed. As the proxy certificate is based on the user certificate, the
first step is obtaining a user certificate.
- Obtain a user certificate.
Similar to a server certificate, a user certificate is issued by a
Certificate Authority, but is for use by an individual to verify his
identity to the server. If the server is configured with a self-signed
certificate, then there is no CA involved and thus creating a user
certificate is difficult. If the server is configured with its
own local CA (which is beyond the scope of this document), then it could
authorize user certificate requests. Instead, let's assume that the server
was configured with a third-party CA. You need
to obtain a client (user) certificate from the same CA.
Instructions For
NCSA's CA...
If the server was configured with a certificate provided by NCSA's
certificate authority, you can obtain an NCSA-issued user certificate.
Log onto
tungsten.ncsa.uiuc.edu or
public-linux.ncsa.uiuc.edu and
run "
/usr/local/NCSA-CA/bin/ncsa-cert-request". Follow the
instructions. Your user certificate and key will be stored in
~/.globus/usercert.pem and
~/.globus/userkey.pem respectively. For more information on NCSA
certificates and policies regarding their issuance, see
http://www.ncsa.uiuc.edu/UserInfo/Grid/Security/.
If the server was configured with a certificate provided by
CAcert.org, then you can go to that
site,
create a free
account, and request a
client certificate.
The procedure will automatically create/import a client certificate in your
browser. You must then export that certificate to a PKCS12 formatted file on
your hard drive, for example
usercred.p12.
If the server's certificate was issued by a commercial certificate provider,
then you can go to that same certificate provider and request a user
certificate.
- Create a proxy certificate based on your user certificate.
A proxy certificate is similar to a user certificate. Actually it is a
client certificate, however rather than having a Certificate Authority (CA)
sign the Certificate Signing Request (CSR), YOU become the CA and use your
user certificate to sign the CSR. At NCSA and at other sites using the CoG
Kit or Globus Toolkit, this process is simplified by some provided
utilities. In other circumstances, you will need to use OpenSSL to create
and sign the CSR.
Instructions For
NCSA And CoG Kit/Globus Installations...
You will be using the utility program "
grid-proxy-init". HOWEVER,
you need a particular version of this program to generate proxy certificates
suitable for our purposes. So run the following command:
grid-proxy-init -help
You are looking for the command line option "
-rfc". If you see
that in the help text, you are ready. Otherwise, you will need to download
and install an appropriate version of the program. Download the CoG Kit
version 4.1.3 from
http://www.cogkit.org/release/4_1_3/cog-4_1_3-bin.tar.gz.
This toolkit requires
Java.
Information on the CoG Kit and detailed installation instructions can be
found at
http://wiki.cogkit.org/index.php/Java_CoG_Kit_Installation_Guide.
With your user certificate and key in the proper locations, run the
following command
grid-proxy-init -rfc
This will generate an RFC3820-compliant proxy certificate. In Linux, this
creates a file in the
/tmp directory named something like
x509up_u_username. In Windows, the file is created in the user's
temporary directory "
%TMP%" with a similar name.
- Convert the proxy certificate into PKCS12 form.
Many applications, including Java KeyStore and Internet Explorer, require
that client certificates (which includes proxy certificates) be in the
PKCS12 format rather than the X509 PEM format. Since the proxy certificate
you just created is in PEM format, you need to
convert
your PEM formatted proxy certificate to PKCS12 format. Note that your
proxy certficate contains both the certificate AND the key, so you will use
the same filename for the command line options for "input certificate"
(-in) and "input key" (-inkey).
- Import the Root Certificate Authority file into Windows Internet
Options.
For Internet Explorer to connect to the server via SSL without any warning
messages, the server's root certificate must be in the list of trusted CAs.
Step By Step Instructions
With Screen Captures...
SHOW
/
HIDE
Step Images
- Select [Start] → [Control Panel] → [Internet Options]
- Select the [Content] tab and click the [Certificates] button.
- Select the [Trusted Root Certification Authorities] tab and click the
[Import] button.
- Click the [Next >] button.
- Click the [Browse...] button and change "Files of type" to "All Files
(*.*)". Navigate to where you stored the root CA file (e.g.
4a6cd8b1.0) and click the [Next >] button.
- Verify that "Place all certificates in the following store" is selected
and that the "Certificate store:" field contains "Trusted Root Certification
Authorities". Then click the [Next >] button.
- Click the [Finish] button.
- Click the [Yes] button at the "Security Warning" popup box.
- NCSA's Certficate Authority entry shows up in the list as "Certification
Authority".
- Import your PKCS12 User Credential into Windows Internet Options.
For the server to allow Interet Explorer to connect, the proxy certificate
must be in the list of Personal certificates.
Step By Step Instructions
With Screen Captures...
SHOW
/
HIDE
Step Images
- Select [Start] → [Control Panel] → [Internet Options]
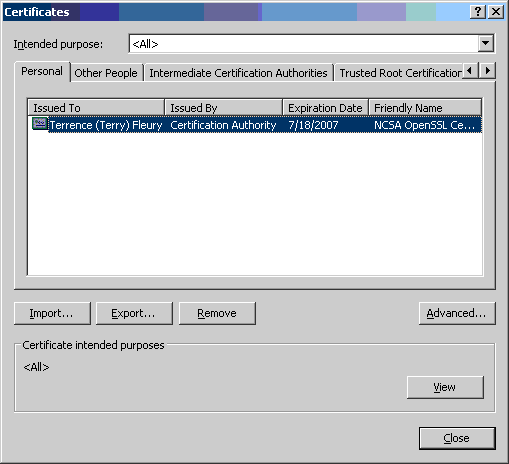
- Select the [Content] tab and click the [Certificates] button.
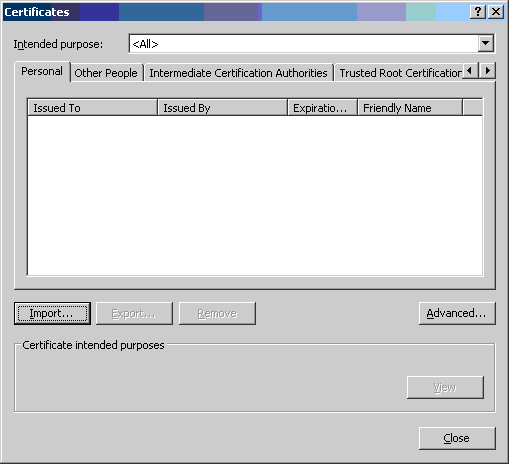
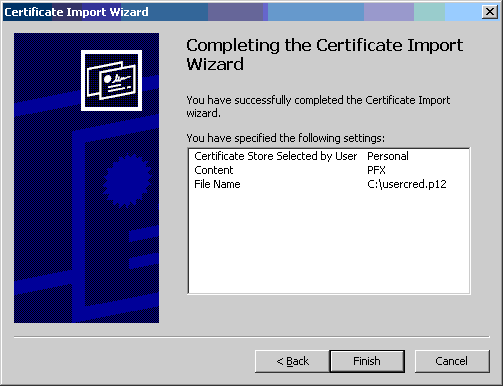
- Select the [Personal] tab and click the
[Import] button.
- Click the [Next >] button.
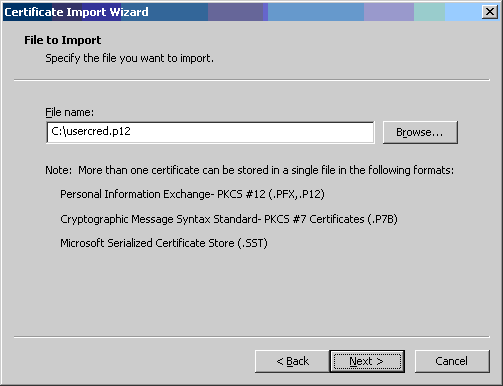
- Click the [Browse...] button and change "Files of type" to "Personal
Information Exchange (*.pkfx,*.p12)".
Navigate to where you stored the proxycred.p12 file and click
the [Next >] button.
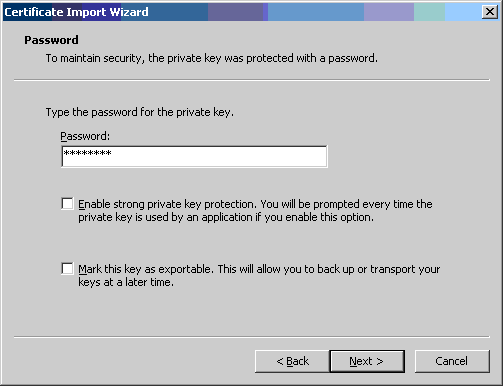
- In the "Password:" text entry box, type the password you used when
converting the proxy certificate to pkcs12 format. Then click the [Next
>] button.
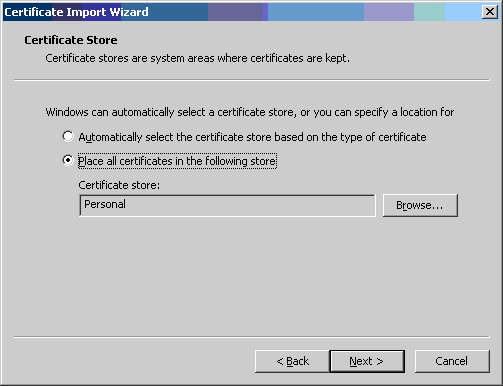
- Verify that "Place all certificates in the following store" is selected
and that the "Certificate store:" field contains "Personal". Then click the
[Next >] button.
- Click the [Finish] button.
- Even though the "Expiration Date" field shows the expiration date of
your USER certificate, the certificate store contains the PROXY certificate
and is valid for only a short time.
- Disable the use of SSL2 in Windows Internet Options.
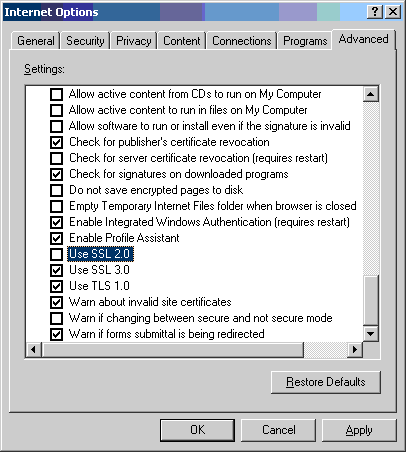
This step is important if you are connecting to Tomcat. By default, Tomcat
will attempt to connect using SSL2 protocols first and Internet Explorer
will fail to connect since SSL2 doesn't support proxy certificates.
Fortunately, you can disable SSL2 in Internet Options.
Step By Step Instructions
With Screen Captures...
SHOW
/
HIDE
Step Images
- Select [Start] → [Control Panel] → [Internet Options]
- Select the [Advanced] tab and scroll to the bottom. Uncheck the "Use
SSL 2.0" option.
- Click the [OK] button to finish.
- Test your https connection.
Now when you use any browser that uses Windows' Internet Preferences
(Internet Explorer, Avant Browser, Slim Browser) and connect to your
https://... site, it will use your user's proxy certificate
correctly.
Note that the proxy certificate has a short life, so you'll have to
remove/import a new proxy certificate every time the old one expires.
 Note: For printing purposes, you can SHOW ALL or
HIDE ALL
instructions and images.


